The first time I tried grooming my dog at home, I ended up wetter than he did.
Shampoo everywhere. A bathroom that looked like a disaster scene. My dog halfway out of the tub with one paw on the floor and a look of pure betrayal on his face.
The nail clipping attempt lasted about four seconds before he pulled his paw away and I gave up completely.
Six months later, grooming takes 45 minutes, happens without drama, and my dog walks into the bathroom on his own when he sees me get the brush out.
The difference was not some secret technique. It was having the right tools, doing things in the right order, and understanding that how to groom a dog at home step by step is genuinely a learnable skill — not an inborn talent that some people have and others do not.
This guide covers everything. Brushing, bathing, nail trimming, ear cleaning, teeth care, and the grooming schedule for every coat type.
Every step in the exact order that makes how to groom a dog at home step by step actually manageable — even if your first attempt was as messy as mine.
Let’s get your dog looking and feeling great.
Most dogs need a full grooming session every 4 to 8 weeks depending on coat type, with brushing done 2 to 3 times per week between full sessions.
Total time: 45 to 80 minutes per full session.
Why Home Grooming Is Worth Learning — More Than Just Looks
Grooming is not cosmetic. It is a genuine health practice that prevents real medical problems — and learning how to groom a dog at home step by step turns it from a stressful ordeal into a simple routine that protects your dog’s health year-round.
- Brushing prevents matting — and mats are not just unsightly. They pull on skin, trap moisture underneath, and create the perfect environment for bacterial and fungal infections that require veterinary treatment.
- Ear cleaning prevents ear infections — the number one reason for veterinary visits in floppy-eared breeds like Cocker Spaniels, Basset Hounds, and Beagles. A 5-minute cleaning every 2 to 4 weeks prevents a $200 vet visit.
- Nail trimming prevents joint damage — Overgrown nails change how a dog walks — shifting weight onto the back of the paw and creating chronic pressure on joints and tendons that leads to arthritis and pain over time.
- Teeth brushing prevents periodontal disease — which affects over 80% of dogs by age 3 and can lead to tooth loss, jaw bone deterioration, and bacterial infections that spread to the heart and kidneys.
The cost savings are real too. Professional grooming runs $50 to $90 per session for a medium-sized dog. Most dogs need 6 to 8 sessions per year. That is $300 to $720 annually.
Dogs that receive regular home grooming sessions every 4 to 8 weeks are significantly less likely to develop matting, ear infections, and dental disease — the three most preventable health issues seen in domestic dogs.
Home grooming after the initial tool investment costs roughly $30 to $50 per year in consumables.
According to the American Kennel Club, regular home grooming between professional sessions is essential for maintaining coat health and catching early signs of skin problems, parasites, lumps, and other health issues before they become serious.
Essential Grooming Tools — What You Actually Need
You do not need twenty tools to groom a dog at home.
You need the right eight — and knowing which tool does which job is half the battle of learning how to groom a dog at home step by step.
The Must-Have Tools
A self-cleaning slicker brush is the single most versatile grooming tool you will own. It removes loose hair, detangles light mats, and works on every coat type from short Labradors to long-haired Golden Retrievers.
A self-cleaning slicker brush used 2 to 3 times per week removes up to 90% of loose undercoat before it becomes a mat — making it the single most important grooming tool for any dog owner.
The self-cleaning mechanism retracts the bristles with one button press — making cleanup after each session take about 3 seconds.
Hertzko Self-Cleaning Slicker Brush — the most popular dog brush on Amazon with over 100,000 reviews. Self-cleaning button, gentle angled bristles, works on all coat types.
Not ideal for: heavily matted coats that need a dematting tool first, or wire-coated breeds that need a stripping knife.
A nail grinder is significantly safer than clippers for beginners.
It files the nail gradually rather than cutting — which means almost zero risk of hitting the quick and causing pain and bleeding.
Casfuy Dog Nail Grinder — whisper-quiet 2-speed motor, LED light to see the quick on dark nails, rechargeable. The LED light alone makes this worth it for dogs with black nails.
Not ideal for: dogs terrified of the vibration sound — introduce gradually over several days with treats before using.
A quality dog shampoo makes the difference between a dog that smells great for a week and one that starts smelling again in two days.
Oatmeal-based formulas are the safest for most dogs — they clean without stripping natural oils.
Wahl USA Oatmeal Dog Shampoo — oatmeal formula with coconut lime verbena, 24 oz bottle, pH balanced for dog skin. Gentle enough for sensitive skin, effective enough for genuinely dirty dogs.
Not ideal for: dogs with diagnosed skin conditions requiring medicated shampoo — ask your vet for specific recommendations.
An ear cleaning solution designed for dogs is essential — never use water, hydrogen peroxide, or alcohol inside the ear canal.
Virbac Epi-Otic Advanced Ear Cleaner — veterinarian recommended, gentle non-irritating formula, dries the ear canal to prevent infections. This is the brand most vet clinics use.
Not ideal for: dogs with active ear infections — see your vet first before cleaning infected ears.
A dog toothbrush and enzymatic toothpaste complete the essential kit.
Human toothpaste contains fluoride which is toxic to dogs — always use dog-specific enzymatic toothpaste.
Virbac CET Enzymatic Dog Toothpaste + Brush Kit — poultry flavored toothpaste dogs actually enjoy, soft-bristled brush sized for dogs, enzymatic formula works between brushings.
Not ideal for: dogs that refuse the brush entirely — try a finger brush first to build acceptance.
A deshedding tool is essential for double-coated breeds — Golden Retrievers, German Shepherds, Huskies, Labrador Retrievers — that blow their undercoat seasonally.
FURminator Undercoat Deshedding Tool — removes loose undercoat without cutting the topcoat, reduces shedding up to 90% when used weekly. The original and still the most effective deshedding tool available.
Not ideal for: single-coated breeds like Poodles, Bichons, or Maltese — they do not have an undercoat to remove.
Tools You Should NOT Buy
- Human shampoo — It has the wrong pH balance for dog skin. Dogs have a skin pH of 6.5 to 7.5, whereas humans are 4.5 to 5.5. Using human shampoo strips their natural oils, causing severe dryness, itching, and irritation.
- Cheap all-in-one grooming kits — The $15 multi-tool kits from discount stores contain materials so low in quality that they actually make grooming harder. Investing in one good brush and one good grinder is far better than owning ten mediocre tools.
- Retractable leashes for restraint — These provide absolutely zero control during a grooming session. Use a proper grooming loop or have a family member hold the dog gently.
- Hair dryers on high heat — Dog skin burns at much lower temperatures than human skin. If you use a hair dryer, stick to the low or cool settings only, and keep the nozzle moving constantly.
These are the two tools you will use in 90% of grooming sessions.
The brush handles coat maintenance between baths and the grinder makes nail trimming genuinely stress-free.
Everything else can be added gradually as you build confidence.

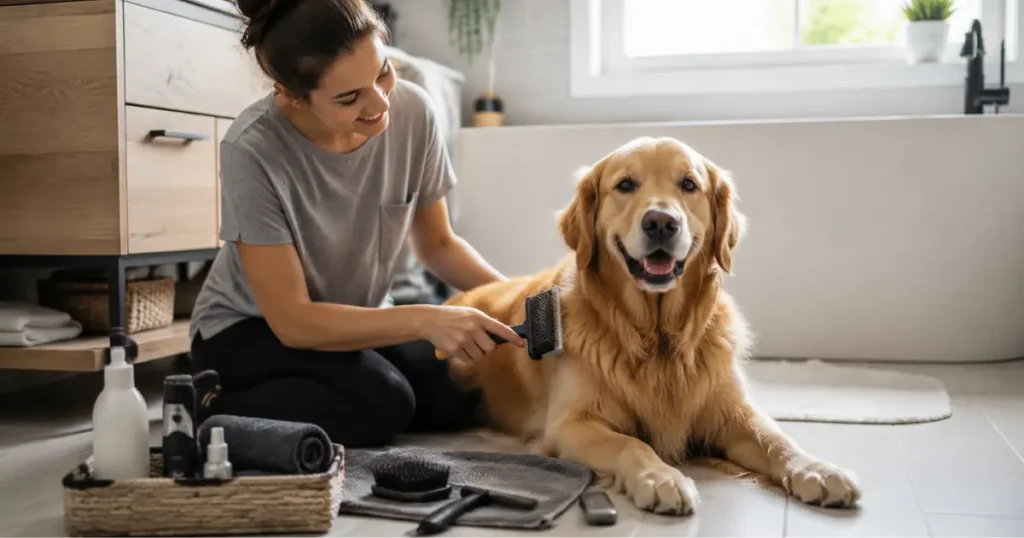
Step 1 — Brushing the Coat — Always First
Brushing always comes first when learning how to groom a dog at home step by step. Always before bathing, always before anything else.
Brushing a wet coat locks in tangles, causes unnecessary pain, and creates a dog that permanently dreads the grooming process.
Step 1 Overview: Brush the Entire Coat Before Anything Else
Use a slicker brush to remove all loose hair, tangles, and beginning mats. Brush in the direction of hair growth using short, gentle strokes. Start at the head and work toward the tail.
The guide visualizes how to prioritize your brushing routine. Focus heavily on high-friction regions like the ears, lower belly, and legs, which are prone to severe matting if skipped.
The Right Brushing Technique
- Brush in the direction of hair growth — never brush against the natural grain of the coat.
- Use short, gentle strokes rather than long, dragging pulls that can scrape the skin.
- Work systematically by starting at the head and moving toward the tail so you do not accidentally miss a spot.
Pay extra attention to behind the ears, armpits, belly, and the back of the legs — these are the four areas that mat first on every dog, regardless of breed.
How to Handle Tangles Safely
If you hit a stubborn tangle, hold the base of the hair above the mat with your fingers firmly against the skin. This anchors the hair and prevents a painful pulling sensation on the skin while you gently pick the outer edges of the mat loose with your slicker brush.
Patience here prevents pain — and a dog that feels safe during brushing will cooperate much better down the line.
For the complete deep dive into brushing different coat types, read our puppy socialization checklist by age, which covers early grooming introduction for puppies.
How Often to Brush — By Coat Type
- Short smooth coats (Beagles, Boxers, Labradors): Need brushing once a week — mainly to remove loose hair and distribute natural oils.
- Double coats (Golden Retrievers, German Shepherds, Huskies): Need brushing 2 to 3 times per week to prevent undercoat mats and manage shedding.
- Long silky coats (Yorkies, Maltese, Shih Tzus): Need daily brushing — their hair tangles like human hair, and mats form within 48 hours without maintenance.
- Curly coats (Poodles, Bichons, Doodle mixes): Need daily brushing with a slicker brush plus a metal comb — curly coats mat the fastest and most severely of any coat type.
Handling Severe Mats
Small mats can be worked out with a slicker brush and patience.
⚠️ Warning on Severe Mats: For severe mats — large, tight, and close to the skin — do not attempt to cut them yourself. Cutting mats close to the skin risks serious cuts that require veterinary treatment. Take severely matted dogs to a professional groomer who has the tools and experience to remove mats safely.
Step 2 — Cleaning the Ears — Before the Bath
Ear cleaning comes before bathing because dirty ears plus bath water equals trapped moisture plus bacteria, which inevitably leads to an ear infection. This order matters.
As shown in the guide above, you want to keep the solution bottle’s tip just inside the ear canal — no deeper. This protects the delicate ear drum from accidental punctures or trauma.
How to Clean Dog Ears Safely
Lift the ear flap to expose the canal opening. Squeeze the ear cleaning solution into the canal — enough to fill it. You will hear a squishing sound when you massage the base of the ear for 20 to 30 seconds.
Let your dog shake — this brings debris up from deep in the canal naturally. Wipe the outer ear and visible canal opening with a cotton ball or soft gauze.
- What never to do: Never use Q-tips or cotton swabs inside the ear canal — they push debris deeper.
- What to avoid: Never use water, hydrogen peroxide, or alcohol — these irritate the delicate canal lining.
- When to stop: Never clean ears that look red, swollen, or smell bad — see your vet first.
How Often to Clean Ears
- Floppy-eared breeds (Cocker Spaniels, Basset Hounds, Beagles): Need weekly ear cleaning.
- Swimmers: Need cleaning after every single swim to clear out trapped water.
- Erect-eared breeds: Regular upright ears only need cleaning every 2 to 4 weeks.
If the ears look clean and smell normal, do not over-clean them — excessive cleaning can irritate perfectly healthy ears.
According to the ASPCA, checking your dog’s ears during regular grooming sessions helps catch signs of infection early — such as redness, swelling, discharge, or odor — before they become painful and require veterinary treatment.
Step 3 — Bathing Your Dog the Right Way
Bath time is where most owners struggle — and where the wrong approach creates a dog that fights grooming for life. Knowing how to groom a dog at home step by step means getting the bath right.
The Correct Bathing Process
- Use a non-slip mat: Place a non-slip mat in the tub or shower first. A dog that slips becomes a dog that panics — and a panicking wet dog is an experience nobody needs twice.
- Check the water temperature: Use lukewarm water only. Test it on your inner wrist like you would for a baby — never hot, never cold.
- Soak the coat completely: Wet the entire coat thoroughly before applying any shampoo. The coat should be soaked completely, not just damp.
- Apply shampoo neck-to-tail: Apply the dog shampoo starting at the neck and working toward the tail. Massage it into the coat with your fingers. Avoid the face, eyes, and ear openings completely — use a damp washcloth for the face only.
- The Golden Rule — Rinse and Repeat: Rinse until the water runs completely clear. Then rinse again. Leftover shampoo residue is the number one cause of post-bath itching, dandruff, and hot spots. If you think you have rinsed enough — rinse one more time.
Dogs should be bathed every 4 to 8 weeks depending on coat type — bathing more frequently than once every 4 weeks strips natural oils and causes the dryness and itching most owners are trying to prevent.
How Often to Bathe
Most dogs genuinely do not need frequent bathing. Over-bathing strips the natural oils that keep the coat and skin healthy — causing the very dryness and itching owners are trying to prevent.
- Short coats: Every 6 to 8 weeks.
- Double coats: Every 6 to 8 weeks (unless visibly dirty).
- Long coats: Every 3 to 4 weeks.
- Curly coats: Every 3 to 4 weeks.
Unless your dog rolled in something genuinely terrible, these schedules are more than enough. Between baths, regular brushing removes most dirt and odor without stripping natural oils.
Drying After the Bath
Towel dry thoroughly first — microfiber towels absorb significantly more water than regular cotton towels.
If you are using a blow dryer, keep it on the lowest heat setting and keep it moving constantly. Never hold the dryer in one spot, as dog skin burns at much lower temperatures than human skin. For dogs that absolutely hate dryers, towel dry them well and let them air dry in a warm room.

Step 4 — Nail Trimming — The Step That Scares Everyone
Nail trimming terrifies most owners more than any other part of learning how to groom a dog at home step by step. But with the right tool and the right technique, it takes less than 5 minutes and is genuinely safe.
Clipper vs Grinder — Which Is Better for Beginners
- Nail Clippers: They are faster and quieter but carry a much higher risk of cutting the quick (the blood vessel inside the nail). One painful experience teaches a dog to fight nail trims for months.
- Nail Grinder: It files the nail gradually with almost zero risk of hitting the quick. It takes slightly longer but produces a smooth finish and is significantly safer for beginners and dogs with dark nails where the quick is invisible from the outside.
For first-time groomers, the grinder wins every time.
How to Trim Safely — Step by Step
- Get Comfortable: Have your dog lie down or sit comfortably. Hold one paw firmly but gently — never tight enough to cause anxiety.
- Identify the Quick: On light-colored nails, identify the pink quick and trim about 2 millimeters before it. On dark nails, trim tiny amounts at a time and look at the cross-section after each pass.
- Watch the Cross-Section: When you see a gray or pink circle appearing right in the center of the dark nail, stop immediately.
- Angle the Trim: Always trim at a 45-degree angle.
- Be Prepared: Have styptic powder ready before you start. If you accidentally nick the quick, apply the powder immediately, and the bleeding will stop within 30 seconds to 2 minutes.
- Reward Constantly: Give a high-value treat after every single paw. This is how you build a dog that tolerates and eventually accepts nail trimming calmly.
If Your Dog’s Nails Are Severely Overgrown
When nails overgrow, the quick grows right along with them. You cannot cut severely overgrown nails back to normal length in one session — you will hit the quick guaranteed.
Overgrown dog nails that click on hard floors cause joint misalignment and chronic pain within 3 to 6 months — trimming every 2 to 4 weeks prevents permanent structural damage to the paws.
⚠️ The Gradual Method: Trim a very small amount every 5 to 7 days. Over 3 to 4 weeks, the quick will naturally recede, allowing you to gradually bring the nails back to a healthy length safely.
If you can hear your dog’s nails clicking on hard floors, they are already too long, and this gradual approach should start immediately.
According to the American Kennel Club, nail trimming is an essential part of grooming — overgrown nails cause splayed feet, reduced traction, deformed toes, and chronic joint pain that worsens with every step.
Day one: let them sniff it while off, give a treat.
Day two: turn it on nearby, give treats.
Day three: touch it to one nail briefly, huge reward.
Day four: grind one nail, celebrate.
This slow introduction prevents the fear response that makes nail trimming a battle for years.
Three extra days of preparation saves months of struggling.

Step 5 — Teeth Brushing — The Most Skipped and Most Expensive to Skip
Dental care is the most neglected part of how to groom a dog at home step by step — and the one that causes the most expensive health problems later. Over 80% of dogs show signs of dental disease by age 3. Professional dental cleaning under anesthesia can easily cost $300 to $800. Regular home brushing prevents most of this.
Over 80% of dogs develop periodontal disease by age 3 — brushing teeth 3 times per week with
enzymatic dog toothpaste reduces this risk by up to 70% and prevents professional dental cleanings that cost $300 to $800 under anesthesia.
Quick Teeth Brushing Routine
- Prep the brush: Apply a pea-sized amount of enzymatic dog toothpaste to the brush.
- Expose the teeth: Gently lift the lip to expose the teeth.
- Angle the bristles: Brush outer surfaces only at a 45-degree angle to the gumline using gentle circular motions. (You don’t need to worry about the inside surfaces, as a dog’s tongue naturally cleans those areas).
- Hit all areas: Make sure to cover all four quadrants systematically — upper left, upper right, lower left, and lower right.
- Keep it quick: Total time should only be about 2 to 3 minutes per session.
For the complete puppy dental care guide, read our guide on how to clean puppy teeth at home.
If Your Dog Will Not Accept the Brush
Some dogs refuse a traditional toothbrush entirely. If yours does, try these steps:
- Try a finger brush first: This slips directly over your finger and feels much less intrusive to a dog than a long-handled brush.
- Use the toothpaste as a treat: Let your dog simply lick the toothpaste off the brush for several days before you actually try brushing. Most dog toothpastes come in poultry or beef flavors that dogs love, helping them associate the brush with a positive reward.
- The backup plan: Dental chews like Greenies are not a complete replacement for regular brushing — but they are significantly better than nothing for dogs that absolutely will not tolerate a brush in their mouth.
The Complete Grooming Order — Quick Reference
This is the exact order for how to groom a dog at home step by step. Follow this sequence every single session for the most efficient, least stressful experience for both you and your dog.
Total time for a full grooming session: 45 to 80 minutes depending on coat type and dog size. Between full sessions, regular brushing handles most maintenance needs in under 15 minutes.
Grooming Schedule by Coat Type
Different coats need different levels of attention. This schedule covers the most common coat types and tells you exactly how to groom a dog at home step by step for each one.
- Short smooth coats — Labradors, Beagles, Boxers, Bulldogs. Brush once a week to remove loose hair and distribute oils. Bathe every 6 to 8 weeks. Minimal grooming breed — easiest to maintain at home.
- Double coats — Golden Retrievers, German Shepherds, Huskies, Australian Shepherds. Brush 2 to 3 times per week with a slicker brush. Use the FURminator deshedding tool weekly during shedding season (spring and fall). Bathe every 6 to 8 weeks. Never shave a double-coated breed — the undercoat insulates against both heat and cold.
- Long silky coats — Yorkshire Terriers, Maltese, Shih Tzus, Afghan Hounds. Brush daily or every other day with a slicker brush and metal comb. Bathe every 3 to 4 weeks. Professional haircuts every 4 to 6 weeks unless you learn to trim at home.
- Wire or rough coats — Schnauzers, most Terrier breeds. Brush 2 to 3 times per week. Professional hand-stripping or clipping every 4 to 6 weeks for correct coat texture maintenance.
- Curly coats — Poodles, Bichon Frise, Doodle mixes. Brush daily without exception. Curly coats mat faster and more severely than any other coat type. Bathe every 3 to 4 weeks. Professional haircuts every 4 to 6 weeks.
Common Home Grooming Mistakes
These mistakes are the ones that turn a simple routine into a battle — and the ones that genuinely harm your dog’s coat and skin if repeated.
- Bathing before brushing is the most damaging mistake. Wet mats tighten and become impossible to remove. A mat that would have taken 2 minutes to brush out dry takes 20 minutes wet — or requires cutting out entirely. Brush first, every time, no exceptions.
- Using human shampoo seems harmless but genuinely damages dog skin. The pH difference between human skin (4.5 to 5.5) and dog skin (6.5 to 7.5) means human shampoo strips the protective oil barrier and causes chronic dryness, itching, and vulnerability to infection.
- Over-bathing is extremely common. Most owners bathe too frequently — weekly or biweekly. Unless your dog rolled in something genuinely terrible, bathing more than once every 4 weeks strips the natural oils that keep their coat and skin healthy. Brush between baths instead.
- Cutting nails too short destroys trust. One painful quick cut teaches a dog to fight nail trims for months. Use a grinder, take small amounts, and stop at the first sign of the quick. Gradual and gentle always beats fast and aggressive.
- Skipping teeth entirely is the most expensive long-term mistake. Dental disease is cumulative. By the time you notice brown teeth, bad breath, or difficulty eating, significant damage has already occurred. Three minutes of brushing three times a week prevents thousands of dollars in dental procedures.
- Forcing grooming on an anxious dog creates a permanent fear response. If your dog is genuinely distressed — panting, trembling, trying to escape — stop the session immediately. Rebuild with shorter, gentler sessions paired with high-value rewards. Patience creates a dog that cooperates. Force creates one that fights.
When to See a Professional Groomer Instead
Home grooming handles about 80% of what most dogs need. But some situations genuinely require professional equipment, training, and experience.
- Go to a professional when your dog needs a full haircut — Poodles, Doodles, Bichons, Schnauzers, and other breeds with continuously growing coats need professional shaping every 4 to 6 weeks.
- Go to a professional when mats are severe and close to skin — professional groomers have the tools and technique to remove close mats safely without cutting the dog.
- Go to a professional when your dog becomes aggressive during nail trimming — professional restraint and handling is safer for everyone involved.
- Go to a professional for anal gland expression — this is not a home grooming task. Leave it to groomers or veterinarians who are trained to do it correctly and safely.
According to the ASPCA, dogs that are improperly or infrequently groomed can develop severe health problems including skin infections, strangulating hair mats, and restricted movement from overgrown nails — making both home grooming and professional grooming essential components of responsible dog ownership.
Explore In-Depth Grooming Guides
This how to groom a dog at home step by step guide covers the complete foundation. These detailed guides go deeper into every specific grooming topic:
- How to trim dog nails at home without hurting them
- Best dog shampoo for itchy sensitive skin
- How to clean dog ears at home safely
- How to deshed a dog at home complete guide
- How to clean puppy teeth at home
Forcing grooming on a genuinely distressed dog causes injuries and creates permanent fear responses.
Some dogs benefit from desensitization training before attempting home grooming.
The grooming techniques in this guide are based on widely accepted practices endorsed by the AKC and ASPCA.
Every dog is different — if your dog has specific skin conditions, coat issues, or health concerns, consult your vet or a professional groomer for personalized guidance.
Frequently Asked Questions(FAQ)
How often should I groom my dog at home?
Full grooming sessions — bath, nails, ears, teeth — should happen every 4 to 8 weeks, depending on your dog’s coat type. Brushing should happen 2 to 3 times per week for most dogs and daily for long or curly coats. Teeth brushing should be done at least 3 times per week. Nail trimming is needed every 2 to 4 weeks. Between full sessions, regular brushing handles most maintenance and keeps the coat clean and healthy.
What order should I groom my dog in?
Always follow this order:
Brush first to remove loose hair and mats.
Clean ears second.
Bathe third.
Dry fourth.
Trim nails fifth.
Brush teeth last.
This order matters because brushing before bathing prevents wet mats from tightening, ear cleaning before bathing prevents dirty water from being trapped, and nails are slightly softer after a bath, making trimming easier.
Can I use human shampoo on my dog?
No. Human shampoo has a different pH level than dog shampoo — human skin runs 4.5 to 5.5, while dog skin runs 6.5 to 7.5. Using human shampoo strips the natural oils from your dog’s coat and disrupts the skin’s protective barrier, leading to chronic dryness, itching, and susceptibility to infection. Always use a shampoo specifically formulated for dogs.
How do I groom a dog that hates being groomed?
Start extremely slow with desensitization. Touch the brush to their body for 2 seconds, and give a high-value treat. Build duration gradually over days. Keep every session very short — 2 to 3 minutes maximum at first. End every session before the dog becomes stressed.
Over time, the positive association builds, and most dogs begin tolerating grooming calmly. If anxiety is severe, consider consulting a professional trainer.
How do I know when my dog’s nails are too long?
If you can hear your dog’s nails clicking on hard floors when they walk, the nails are too long. Properly trimmed nails should not touch the ground when the dog is standing on a flat surface. Overgrown nails cause splayed toes, reduced traction, and chronic joint pain that worsens with every step.
Do I really need to brush my dog’s teeth?
Yes — over 80% of dogs show signs of dental disease by age 3, making it one of the most common health issues veterinarians see. Regular brushing at least 3 times per week with enzymatic dog toothpaste is the most effective prevention.
Professional dental cleaning under anesthesia costs $300 to $800 — a $10 toothbrush and $8 toothpaste prevent most of that expense entirely.
What is the best brush for my dog’s coat type?
A self-cleaning slicker brush is the most versatile option and works for nearly all coat types. For heavy-shedding double-coated breeds, add a deshedding tool like the FURminator for weekly undercoat removal. For long silky coats, add a metal comb for fine detangling. For curly coats, a slicker brush plus a metal comb is the essential daily combination.
How much money does home grooming save?
Professional grooming costs $50 to $90 per session for a medium-sized dog, and most dogs need 6 to 8 sessions per year — totaling $300 to $720 annually.
Home grooming tool investment is approximately $80 to $120 one time, plus $30 to $50 per year in consumables like shampoo and ear cleaner. The initial investment pays for itself after the first skipped professional session, and the annual savings range from $250 to $600.
Your Dog Deserves This — Final Thoughts
That first grooming disaster — the soaked bathroom, the four-second nail trim, the shampoo-covered dog staring at me like I had personally betrayed his trust — was about two years ago now.
These days grooming takes 45 minutes. My dog walks into the bathroom voluntarily when he sees the brush come out. Not because he loves bath time — he tolerates it. But he knows the routine. He knows what comes next. He knows treats are involved. And he knows the whole thing ends with him clean, comfortable, and praised.
That is what learning how to groom a dog at home step by step actually builds. Not a dog that loves every second of grooming — that is unrealistic. A dog that trusts the process because you made it consistent, gentle, and rewarding every single time.
Three things to take with you:
- Brush before bath, every single time. Wet mats tighten. Dry mats come out. This one rule prevents the most common grooming pain point for every dog.
- Rinse until the water runs clear — then rinse one more time. Leftover shampoo residue is the number one cause of post-bath itching. The easiest grooming problem to prevent is also the one most owners miss.
- Go slow with anxious dogs. Two seconds of touching the brush plus a treat builds more lasting trust than twenty minutes of forced grooming. Patience creates a dog that cooperates forever. Force creates one that fights forever.
For the complete foundation of everything your puppy needs — read our guide on how to take care of a puppy for the first time.
And if your dog needs crate rest after grooming sessions while they are still getting comfortable with the process — read our guide on how to crate train a dog that hates the crate for the complete positive introduction method.
