My dog’s ear infection cost me $287.
Not the first one — that was only $85. But by the third visit in four months, between the vet exam, the culture test, the medicated drops, and the follow-up appointment, I was sitting in the parking lot staring at a receipt wondering how ear problems had become my most expensive recurring vet bill.
The vet’s exact words on visit three: “Are you cleaning his ears at home between appointments?”
I was not. I genuinely did not know I was supposed to.
That conversation changed everything.
Once I learned how to clean dog ears at home properly — the right solution, the right technique, the right frequency — the infections stopped. Completely.
Three infections in four months became zero infections in the next eighteen months.
Ear cleaning is the single most effective preventive measure against ear infections in dogs.
It takes 3 to 5 minutes, costs less than $15 per bottle of solution, and prevents vet visits that run $100 to $300 each.
This guide covers everything. The anatomy you need to understand, how to clean dog ears at home step by step, the products that actually work, the mistakes that cause infections, and the signs that mean you need a vet instead of a cleaning.
Let’s save you $287.
The product recommendations in this guide are based on widely available vet-informed research and professional groomer experience.
Every dog’s skin is different — if your dog has chronic skin issues, consult your veterinarian for a specific diagnosis and treatment plan before relying on shampoo changes alone.
Why Ear Cleaning Matters — More Than Most Owners Realize
Ear infections are the number one reason dog owners visit the veterinarian — ahead of skin problems, digestive issues, and dental disease.
And the majority of these infections are preventable with regular cleaning at home.
Ear infections are the most common reason for veterinary visits in dogs — accounting for approximately 20% of all vet appointments, with floppy-eared breeds like Cocker Spaniels, Basset Hounds, and Beagles being 3 times more likely to develop infections than erect-eared breeds.
Understanding why infections happen makes learning how to clean dog ears at home genuinely meaningful instead of just another grooming chore.
A dog’s ear canal is L-shaped — it goes down vertically, then makes a horizontal turn toward the eardrum. This design traps moisture, wax, debris, and bacteria in the horizontal portion where air circulation is minimal.
In floppy-eared dogs, the ear flap covers the canal opening entirely — creating a warm, dark, moist environment that is ideal for bacterial and yeast growth. Regular cleaning removes the buildup before it reaches the level that triggers infection.
It is that straightforward.
The wax and debris that accumulate naturally in every dog’s ear canal are not harmful in small amounts — but when they build up beyond what the ear can manage on its own, bacteria multiply and infection begins.
According to the American Kennel Club, ear infections are one of the most common and recurring problems in dogs, and regular at-home cleaning with a vet-approved solution is the most effective preventive measure available to owners.
The Real Cost of Skipping Ear Cleaning
- A single ear infection vet visit costs $100 to $200 including exam and medication.
- Recurring infections add culture tests at $50 to $100 each.
- Chronic infections can lead to surgery — $1,500 to $3,000 for severe cases.
- A bottle of quality ear cleaning solution costs $10 to $15 and lasts 2 to 3 months.
- Five minutes every 2 to 4 weeks prevents hundreds to thousands of dollars in treatment.
The math alone makes learning how to clean dog ears at home one of the highest-return investments in dog ownership.

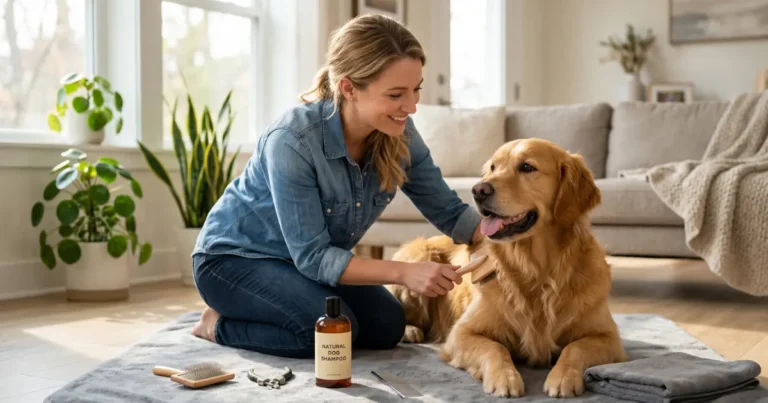
What You Need — The Right Products Matter
Using the wrong product inside your dog’s ear can cause more damage than skipping the cleaning entirely. The ear canal is delicate — and what you put in it matters as much as how you clean.
The Best Ear Cleaning Solutions
A vet-approved ear cleaning solution is the only product that belongs inside your dog’s ear canal. These solutions are specifically formulated to break down wax, dry the canal, and maintain the pH environment that prevents bacterial growth.
Virbac Epi-Otic Advanced Ear Cleaner — 8 oz — the gold standard in veterinary ear cleaning, used in most vet clinics.
Low pH formula with patented glycotechnology that limits bacterial adhesion to the ear canal surface.
Removes wax and debris, dries the canal, eliminates odor at the source.
Safe for dogs and cats of all ages — can be used 2 to 3 times per week on sensitive ears.
Not ideal for: dogs with ruptured eardrums — do not use if eardrum is perforated.
Also avoid using alongside other ear treatments on the same day.
Your dog will shake solution everywhere.
Zymox Otic Enzymatic Solution with 1% Hydrocortisone — for ears showing early signs of irritation — mild redness, slight odor, or recurring wax buildup.
The LP3 Enzyme System fights bacteria, fungi, and yeast without antibiotics, while 1% hydrocortisone relieves itching and inflammation.
No pre-cleaning needed — apply directly to the ear canal once daily for 7 days.
Not ideal for: pregnant or lactating dogs — hydrocortisone is not recommended in these cases.
Also avoid if your dog is already using another topical ear treatment — the enzyme system works best without other products interfering.
VetWELL Ear Cleaner for Dogs and Cats — 8 oz — a budget-friendly vet-formulated ear cleaner with aloe vera that gently deodorizes, cleans, and dries the ear canal.
Removes wax buildup, dirt, and debris that cause infections.
Pleasant cucumber melon scent.
Safe for daily use.
Not ideal for: dogs sensitive to any fragrance — choose Virbac Epi-Otic fragrance-free instead.
Supplies You Need for Every Session
- Ear cleaning solution — one of the three above
- Cotton balls or soft gauze pads — for wiping
- Treats — high value, ready before you start
- A towel — your dog will shake solution everywhere
Veterinarians strongly advise against using water, hydrogen peroxide, rubbing alcohol, or cotton swabs (Q-tips) inside a dog’s ear canal.
All of these cause irritation, damage the delicate canal lining, or push debris deeper toward the eardrum.
Water does not break down ear wax effectively and leaves moisture trapped in the canal — exactly the environment bacteria need to multiply.
Hydrogen peroxide fizzes and feels like it is “working” but it damages healthy tissue in the ear canal, causes pain, and can worsen existing irritation.
Rubbing alcohol stings intensely on any microscopic abrasion and dries the canal so aggressively that it triggers reactive overproduction of wax.
Cotton swabs (Q-tips) push debris deeper into the L-shaped canal rather than removing it — and they risk puncturing the eardrum if inserted too far.
Pet MD Dog Ear Cleaning Wipes — 100 Count — pre-soaked with aloe vera and eucalyptus for quick outer ear cleaning between full solution cleanings.
Removes wax, dirt, and debris from the ear flap and visible canal opening.
Alcohol-free, non-irritating, safe for dogs over 12 weeks.
100 wipes per container — keeps going for months.
Not ideal for: replacing full canal cleaning with solution — wipes handle surface cleaning only. Use Virbac Epi-Otic for complete deep canal cleaning.
When everything is in one grab-and-go bag, the entire cleaning process takes under 5 minutes and you never find yourself halfway through a cleaning searching for cotton balls while your dog walks away.
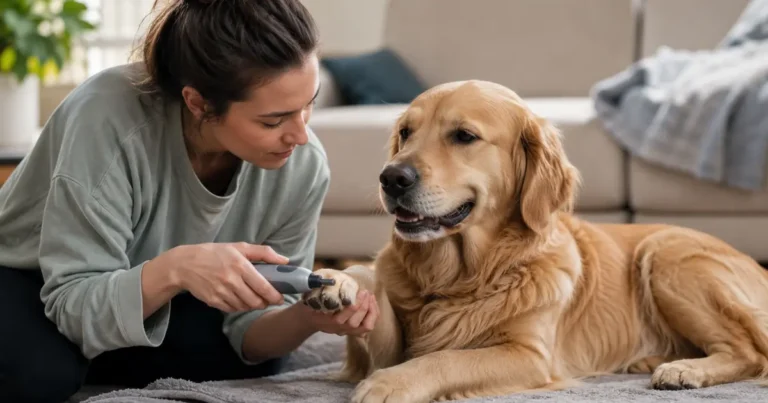
How to Clean Dog Ears at Home — Step by Step Method
This is the complete process — the same method veterinarians recommend and professional groomers use daily.
Learning how to clean dog ears at home correctly prevents infections and keeps the cleaning experience positive for your dog.
Step 1 — Prepare Everything Before Touching the Ears
Have your solution, cotton balls, treats, and towel within arm’s reach.
Let your dog sniff the bottle.
Give a treat.
This 15-second routine before every session signals to your dog that ear cleaning predicts good things.
Begin only when your dog is calm and relaxed — not after play or excitement.
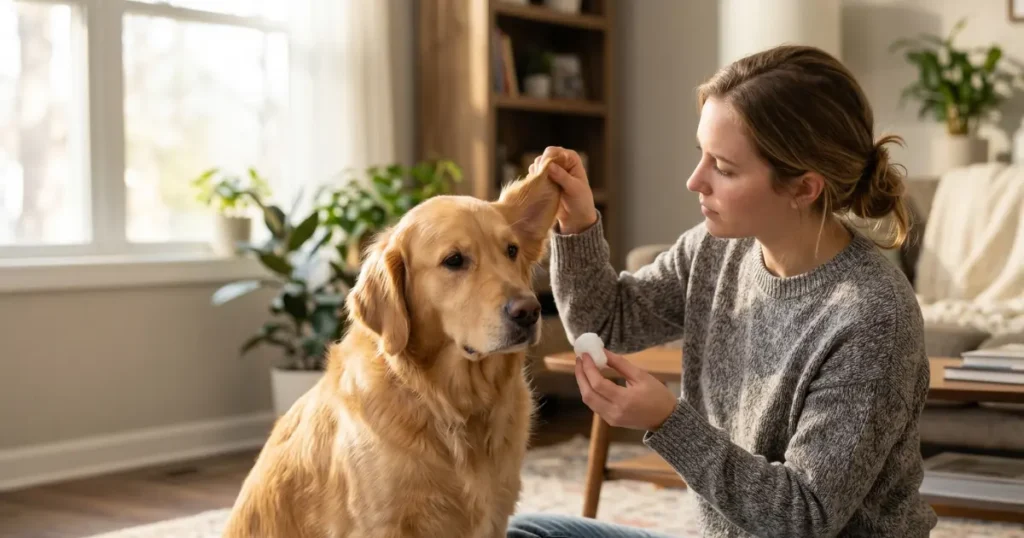
Step 2 — Fill the Ear Canal
Lift the ear flap gently to expose the canal opening.
Hold the solution bottle tip close to the ear — not shoved inside.
Squeeze solution into the canal until you can see liquid pooling at the opening.
Most owners use too little solution.
The canal needs to be filled — not just dampened.
Too little solution means debris stays stuck.
Too much simply overflows harmlessly.
Err on the side of more rather than less.
Step 3 — Massage the Base
This is where the actual cleaning happens.
Fold the ear flap down.
Place your thumb and forefinger at the base of the ear — where the ear meets the head.
Massage in a gentle circular motion for 20 to 30 seconds.
You will hear a squishing sound.
That is the solution moving through the L-shaped canal and breaking up the wax and debris that has accumulated.
This milking action is what brings material from the deep horizontal portion of the canal up to where it can be wiped away.
Step 4 — Let Your Dog Shake
Stand back.
This part is non-negotiable — your dog will shake their head vigorously and solution plus dissolved debris will spray everywhere within a 3-foot radius.
Do this in the bathroom, kitchen, or outside.
Not on the living room carpet.
The shaking is not optional or avoidable — it is actually part of the cleaning process.
The centrifugal force brings loosened material from deep in the canal up to the outer ear where you can wipe it away.
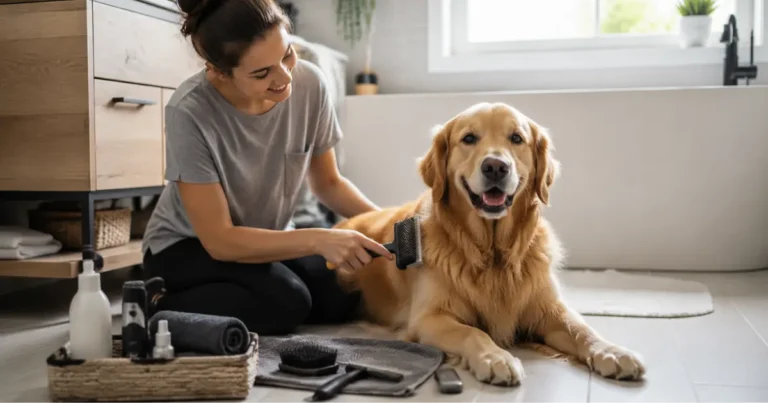
Step 5 — Wipe the Outer Ear
Take a cotton ball and gently wipe the inner surface of the ear flap, the ridges and folds, and the visible opening of the ear canal.
You will see brown, yellow, or gray wax and debris on the cotton — that is normal and exactly what you are removing.
When cleaning dog ears at home, use cotton balls or soft gauze to wipe the visible outer ear only.
Never insert anything into the ear canal deeper than your first finger knuckle, as the L-shaped canal makes it easy to push debris toward the eardrum rather than removing it.
Switch to a fresh cotton ball when the first one is dirty.
Repeat until the cotton comes away relatively clean — it does not need to be spotless, just free of significant debris.
Reward with a treat after each ear.
High-value rewards build the association that makes future cleanings calm and cooperative.
According to the American Kennel Club, using absorbent gauze rather than cotton balls or paper towels is preferred by many veterinarians because gauze does not leave fibers behind in the ear canal that can cause irritation.

How Often to Clean — Cleaning Schedule by Ear Type
Not every dog needs the same cleaning frequency.
Cleaning too often irritates healthy ears.
Cleaning too rarely allows buildup that leads to infection.
Knowing how to clean dog ears at home means knowing when to clean and when to leave them alone.
Floppy-eared breeds like Cocker Spaniels, Basset Hounds, and Beagles need weekly ear cleaning because the ear flap traps moisture and limits air circulation — while erect-eared breeds like German Shepherds typically need cleaning only every 3 to 4 weeks.
Floppy-eared breeds — Cocker Spaniels, Basset Hounds, Beagles, Golden Retrievers, Labrador Retrievers, Cavalier King Charles Spaniels — need weekly cleaning.
The ear flap covers the canal completely, trapping moisture and creating the warm, dark environment that bacteria and yeast thrive in.
Weekly cleaning removes the buildup before it reaches infection-triggering levels.
Erect-eared breeds — German Shepherds, Huskies, Corgis, Australian Cattle Dogs — need cleaning every 3 to 4 weeks.
Their ear canal has natural air circulation because the ear flap stands upright, which keeps the canal drier and less hospitable to bacteria.
Dogs that swim — regardless of ear type — need cleaning after every swim.
Water that enters the canal during swimming is the single most common trigger for ear infections in active dogs.
Dry the outer ear immediately after swimming and use an ear drying solution to prevent moisture from sitting in the canal.
Vet’s Best Dog Ear Cleaner Kit — specifically useful for dogs that swim regularly. Helps clean and dry the ear canal without the harshness of alcohol-based drying agents.
Not ideal for: dogs with active ear infections, redness, bad smell, discharge, swelling, or pain. Treat the infection first.
Dogs showing no signs of ear problems — clean, pink, odor-free ears — should not be over-cleaned.
If the ears look fine and smell normal, cleaning every 4 weeks is sufficient.
Over-cleaning disrupts the natural balance of healthy bacteria in the canal and can actually trigger the problems you are trying to prevent.

Signs of Infection, When NOT to Clean and When to See a Vet
This section is critical. Knowing how to clean dog ears at home includes knowing when to stop cleaning and get veterinary help instead.
Cleaning an infected ear at home can spread the infection deeper, cause pain, and delay proper treatment.
Signs Your Dog Has an Ear Infection, Do Not Clean
- Red, swollen ear canal, visibly inflamed beyond normal pink
- Brown, yellow, or green discharge, especially if thick or pus-like
- Strong yeasty or foul smell, healthy ears have no significant odor
- Pain when the ear is touched, dog flinches, yelps, or pulls away
- Head shaking that is constant and aggressive
- Head tilting to one side persistently
- Loss of balance or coordination
- Scratching at the ear constantly, to the point of creating sores
If any of these are present, see your veterinarian before attempting to clean.
Cleaning an infected ear pushes bacteria deeper and can cause the infection to spread from the outer ear to the middle and inner ear, where it becomes significantly more serious, more painful, and more expensive to treat.
What the Vet Will Do
Your vet will examine the ear canal with an otoscope, take a sample for cytology or culture to identify the specific bacteria or yeast causing the infection, and prescribe targeted treatment, typically medicated ear drops applied daily for 7 to 14 days.
Most uncomplicated ear infections resolve within 1 to 2 weeks of proper treatment.
After the infection clears, regular home cleaning prevents recurrence.
Breeds Most Prone to Ear Infections
Some breeds are genetically predisposed to chronic ear problems:
- Cocker Spaniels, the breed most associated with ear infections due to extremely heavy ear flaps and narrow canals
- Basset Hounds, massive ear flaps that drag on the ground, collecting debris
- Shar-Peis, narrow ear canals that trap moisture
- Poodles and Doodle mixes, hair growth inside the ear canal traps wax
- Labrador Retrievers, love swimming, water enters ears regularly
- Bulldogs, narrow ear canals, prone to allergies that affect ears
If your dog is one of these breeds, weekly cleaning is not optional, it is essential preventive care.
According to the ASPCA, regular grooming that includes ear checks helps detect early signs of infection, redness, swelling, discharge, and odor, before they progress to painful conditions requiring veterinary treatment.
Common Ear Cleaning Mistakes
These mistakes are why some owners clean their dog’s ears regularly and still end up at the vet with infections.
Using water instead of cleaning solution is the most common mistake.
Water does not break down ear wax, does not dry the canal, and leaves moisture trapped in the horizontal portion where bacteria multiply.
Always use a formulated ear cleaning solution, never water.
Not using enough solution is the second most common mistake.
A few drops do nothing. The canal needs to be filled, you should see liquid pooling at the opening.
Underdosing means debris stays stuck to the canal walls and the cleaning was essentially pointless.
Using Q-tips inside the canal is genuinely dangerous.
Cotton swabs push wax and debris deeper into the L-shaped canal rather than removing it, and they can puncture the eardrum if inserted too far.
Cotton swabs are acceptable only for cleaning the visible outer folds of the ear flap, never the canal itself.
Cleaning infected ears at home delays proper treatment.
If the ear is red, swollen, painful, or producing discharge, cleaning at home will not fix it and may make it worse.
See your vet first, treat the infection, then resume cleaning for prevention.
Not drying ears after swimming is the most avoidable trigger for water-loving breeds.
Every swim session should end with:
- Towel-drying the outer ear
- Ideally applying an ear drying solution to prevent moisture from sitting in the canal
Cleaning too frequently disrupts the healthy bacterial balance in the ear canal.
If your dog’s ears look clean and smell normal, over-cleaning can cause the very irritation you are trying to prevent.
Follow the schedule for your dog’s ear type, do not clean daily.
Lift the ear flap and smell the ear canal.
A healthy ear smells like nothing or has a very faint neutral scent.
The moment you detect a yeasty, musty, or sour smell — that is the earliest sign of bacterial or yeast overgrowth.
Clean immediately.
If the smell persists after cleaning, call your vet.
This 5-second sniff test catches problems days before visible symptoms appear.
Introducing Ear Cleaning to Puppies and Anxious Dogs
A puppy that has positive early experiences with ear handling becomes an adult dog that sits calmly for ear cleaning.
An adult dog with no prior experience needs gradual desensitization, rushing it creates lasting resistance.
For Puppies, Start Early
Begin handling your puppy’s ears from the first week home, gently lifting the ear flap, touching inside the ear with your finger, giving a treat.
No cleaning solution yet.
Just positive association with ear handling.
First actual cleaning at 8 to 10 weeks, use a small amount of solution, gentle massage, wipe, and a massive treat reward.
Keep it under 2 minutes total.
Build duration gradually over weeks.
For the complete puppy introduction schedule including early grooming exposure, read our puppy socialization checklist by age.
For Anxious Adult Dogs
- Day 1, touch the ear flap for 2 seconds. Treat. Repeat 5 times.
- Day 2, lift the ear flap and look inside. Treat. Repeat on both ears.
- Day 3, touch inside the ear with your finger for 3 seconds. Treat.
- Day 4, let the dog sniff the solution bottle. Treat. Touch the bottle to the ear. Treat.
- Day 5, put a small amount of solution on a cotton ball. Wipe the outer ear flap only. Treat.
- Day 6, small amount of solution into the canal. Brief massage. Let shake. Treat massively.
- Day 7, full cleaning on one ear. If calm, do the second ear. If stressed, second ear tomorrow.
This gradual approach takes one week but saves months of fighting.
A dog that trusts the process cooperates for life.
According to the American Kennel Club, cleaning dog ears at home should follow a consistent routine of filling the canal with solution, massaging the base, allowing the dog to shake, and wiping with gauze, using the same steps every time to build predictability and trust.
Cleaning an infected ear can push bacteria deeper into the canal and spread the infection to the middle and inner ear.
See your veterinarian first for proper diagnosis and treatment.
Resume home cleaning only after the infection has fully cleared.
The ear cleaning techniques in this guide are based on widely accepted veterinary-endorsed grooming practices recommended by the AKC and ASPCA.
If your dog has chronic ear problems, ear pain, or any signs of infection, consult your veterinarian before attempting home ear cleaning.
Frequently Asked Questions (FAQ)
How often should I clean my dog’s ears?
Every 2 to 4 weeks for most dogs with erect ears.
Weekly for floppy-eared breeds like Cocker Spaniels, Basset Hounds, Golden Retrievers, and Beagles.
After every swim, for dogs that go in water regularly.
If your dog’s ears look clean and smell normal, do not over-clean. Excessive cleaning disrupts the healthy bacterial balance and can trigger the very irritation you are trying to prevent.
Can I use water to clean my dog’s ears?
No.
Water does not effectively break down earwax, does not dry from the ear canal properly, and leaves moisture trapped in the horizontal portion where bacteria multiply rapidly.
Always use a veterinary-formulated ear cleaning solution designed specifically for the pH and anatomy of the canine ear canal.
Solutions like Virbac Epi-Otic are designed to clean, dry, and maintain the environment that prevents infection.
Can I use hydrogen peroxide in my dog’s ears?
No, hydrogen peroxide damages healthy tissue in the ear canal, causes pain and irritation, and can worsen existing problems rather than helping.
While it appears to be “working” because of the fizzing action, that fizzing is actually damaging delicate canal tissue.
Veterinary ear cleaning solutions are specifically formulated to be effective without causing tissue damage.
What does a healthy dog ear look like?
A healthy dog ear is pink, not red, odor-free, and comfortable when touched.
The canal opening should be clean with minimal visible wax. Light yellow or tan is normal.
There should be no swelling, no discharge, no redness, and no sensitivity to touch.
Checking your dog’s ears weekly, even between cleaning sessions, allows you to catch early signs of problems before they become infections.
My dog shakes their head constantly. Is it an ear problem?
Occasional head shaking after ear cleaning or getting water in the ears is normal.
Constant, aggressive head shaking throughout the day, especially combined with scratching, rubbing the head on furniture, or tilting the head to one side, is a strong sign of an ear infection, ear mites, or a foreign body in the canal.
See your veterinarian rather than attempting to clean at home, as cleaning an infected ear can worsen the condition.
How do I know if my dog has ear mites vs an ear infection?
Ear mites produce a distinctive dark brown or black discharge that resembles coffee grounds and causes intense itching.
Bacterial ear infections produce yellow, brown, or green discharge with a strong odor.
Both require veterinary treatment. Ear mites need specific anti-parasitic medication, while bacterial infections need antibiotic drops.
A vet examination with cytology can distinguish between them definitively.
Should I pluck hair from my dog’s ear canal?
This is debated among veterinarians and groomers.
Some breeds, Poodles, Schnauzers, and Bichons, grow hair inside the ear canal that can trap wax and moisture.
Many groomers routinely pluck this hair, but some veterinary dermatologists argue that plucking causes inflammation that increases infection risk.
Ask your specific veterinarian for guidance on your breed. The answer varies depending on the dog’s ear health history.
What is the best ear cleaner for dogs?
Virbac Epi-Otic Advanced Ear Cleaner is the most widely recommended ear cleaning solution by veterinarians.
It is alcohol-free, sting-free, and uses patented glycotechnology that limits bacterial adhesion to the canal surface.
It can be used 2 to 3 times per week safely and does not interfere with other ear treatments.
For dogs showing early irritation signs, Zymox Otic Enzymatic Solution with hydrocortisone provides both cleaning and itch relief.
Clean Ears, Happy Dog, Final Thoughts
Three ear infections in four months.
$287 in vet bills for one ear.
A dog that cried when I touched the left side of his head.
Then one conversation with my vet, a $13 bottle of Virbac Epi-Otic, and 5 minutes every week.
Zero infections in eighteen months.
Learning how to clean dog ears at home was the single most impactful grooming skill I picked up as a dog owner.
Not because it is complicated, it genuinely is not.
But because the gap between doing it and not doing it is the difference between a healthy, comfortable dog and hundreds of dollars in preventable vet bills.
Three things to take with you:
- Use the right solution, not water. Fill the canal, massage for 20 to 30 seconds, let them shake, and wipe with cotton. The technique is simple when the product is correct. Water and hydrogen peroxide cause the problems they are supposed to fix.
- Match the frequency to the ear type. Floppy ears need weekly cleaning. Erect ears need cleaning every 3 to 4 weeks, after swimming, always clean and dry. Over-cleaning healthy ears is as problematic as under-cleaning dirty ones.
- Know when to stop and call the vet. Red, swollen, painful, smelly ears are infected, not dirty. Cleaning an infection at home pushes bacteria deeper. The vet fixes the infection. You prevent the next one.
For the complete home grooming routine, brushing, bathing, nails, ears, and teeth in order, read our guide on how to groom a dog at home step by step.
And if your dog’s itchy ears are part of a larger skin sensitivity pattern, the shampoo you use matters as much as the ear cleaning. Read our guide on best dog shampoo for itchy sensitive skin.
For puppies just starting their grooming journey, early ear handling builds lifetime cooperation. Read our guide on how to take care of a puppy for the first time.